In this post I'll explain how to use a cloud pubsub service such as Ably to visualize the progress of a serverless workflow in realtime.

You'll learn:
- How to build serverless workflows with Azure Functions & Durable Functions.
- How to publish messages from activity functions in the back-end.
- How to subscribe to these messages in the front-end.
Background
Organizations that have their business processes automated often need to show the progress of these processes to their users - either via internal dashboards, or via external client portals. Common use cases include applying for a reimbursement at your health insurance provider, or making an online purchase.
Over the years, automation has resulted in the decoupling of front-ends and back-ends. Although decoupling is great for improving resiliency and effective scaling, it does make it more challenging to inform the front-end of status updates that occur in the back-end, especially with asynchronous communication, and serverless back-ends that are not always running.
A suitable way to update a front-end from back-end processes is to use pubsub over WebSockets. In this post I'll show how to use Ably, a cloud based pubsub service, to visualize the progress of a serverless workflow implemented with Azure Functions and Durable Functions.
Tech stack

The project uses the following components:
- Azure Functions, the serverless compute service in Azure.
- Durable Functions, an extension for Azure Functions that allows writing workflows as code and enables stateful functions.
- Vue3, a popular front-end framework.
- Azure Static Web Apps, a hosting solution in the Azure cloud.
- Ably, a serverless pubsub service for realtime messaging at scale.
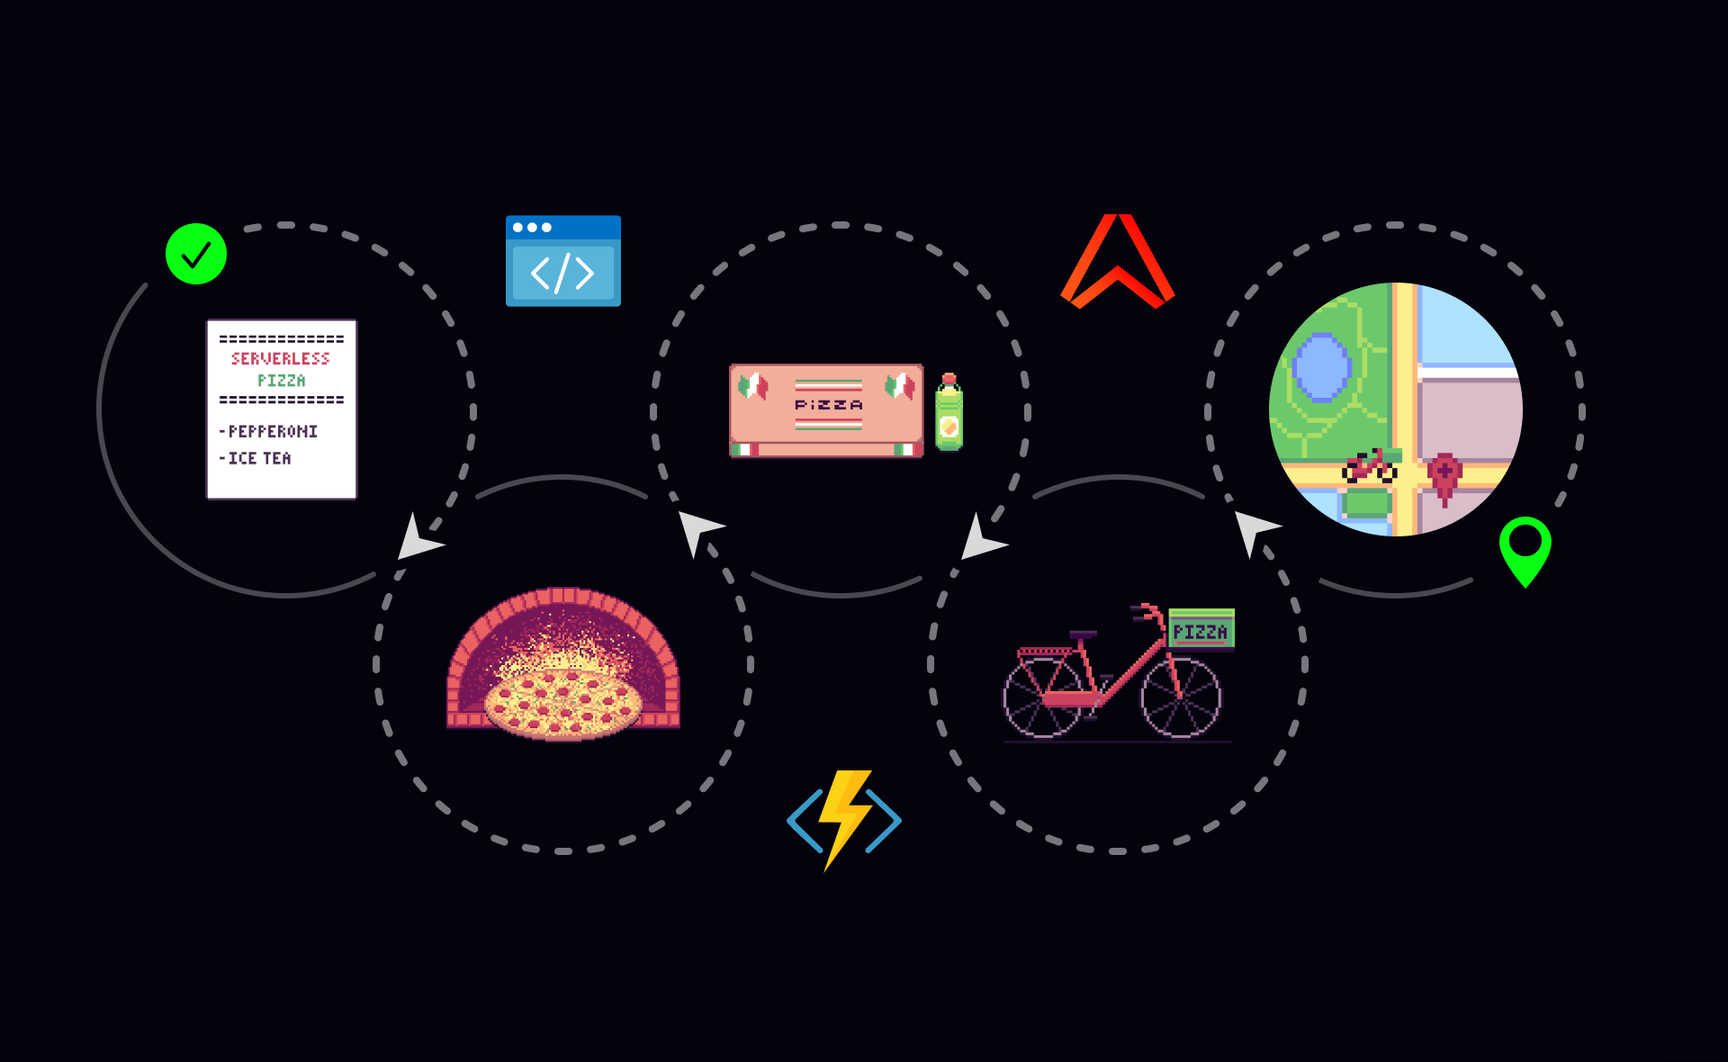
This diagram show the various functions and their interactions:

The serverless workflow
The serverless workflow is implemented with Durable Functions. This is an extension for Azure Functions that allows workflows to be written as code. It enables stateful orchestrator functions because an Azure storage account is used behind the scenes. The interactions with the storage account, the queues, and table storage, are abstracted away. The Durable Functions API is used when writing an orchestrator function that chains several activity functions in a sequence. The code below shows the PizzaWorkflowOrchestrator function that is chaining six activity functions:
public class PizzaWorkflowOrchestrator
{
    [FunctionName(nameof(PizzaWorkflowOrchestrator))]
    public async Task Run(
        [OrchestrationTrigger] IDurableOrchestrationContext context,
        ILogger logger)
    {
        var order = context.GetInput<Order>();

        var instructions = await context.CallActivityAsync<IEnumerable<Instructions>>(
            nameof(ReceiveOrder),
            order);
        await context.CallActivityAsync(
                nameof(SendInstructionsToKitchen),
                instructions);

        var preparationTasks = new List<Task>();
        foreach (var instruction in instructions)
        {
            if (instruction.MenuItem.Type == MenuItemType.Pizza)
            {
                preparationTasks.Add(context.CallActivityAsync(
                    nameof(PreparePizza),
                    instruction));
            }
        }

        await Task.WhenAll(preparationTasks);

        await context.CallActivityAsync(
            nameof(CollectOrder),
            order);
        await context.CallActivityAsync(
            nameof(DeliverOrder),
            order);
        await context.CallActivityAsync(
            nameof(DeliveredOrder),
            order);
    }
}

/// For the full implementation see https://github.com/ably-labs/serverless-workflow-visualizer/blob/main/api/PizzaWorkflow/Orchestrators/PizzaWorkflowOrchestrator.cs.
The responsibility of the orchestrator function is to initiate the execution of the activity functions in the right order. The orchestrator function will replay from the start several times and therefore the function must be deterministic to avoid side effects. Any non-deterministic behavior (e.g. communication with external APIs) should be put in activity functions.
In this demo, the activity functions are merely placeholders and don't do anything meaningful. The functions only log information statements, simulate a randomized wait time, and publish the progress to Ably.
Publishing messages from the back-end
Since each of the activity functions require their progress to be published, I created an abstract MessagingBase class to wrap the publishing behavior for easy re-use.
public abstract class MessagingBase
{
    private readonly IRestClient _ablyClient;

    protected MessagingBase(IRestClient ablyClient)
    {
        _ablyClient = ablyClient;
    }

    protected async Task PublishAsync(string orderId, string eventName, object data)
    {
        var channelName = $"{Environment.GetEnvironmentVariable("ABLY_CHANNEL_PREFIX")}:{orderId}";
        var channel = _ablyClient.Channels.Get(channelName);
        await channel.PublishAsync(eventName, data);
    }
}

/// For the full implementation see https://github.com/ably-labs/serverless-workflow-visualizer/blob/main/api/PizzaWorkflow/Activities/MessagingBase.cs.
The activity functions inherit from this abstract class and call the PublishAsync method, as can be seen in the CollectOrder activity function:
 public class CollectOrder : MessagingBase
{
    public CollectOrder(IRestClient ablyClient) : base(ablyClient)
    {
    }

    [FunctionName(nameof(CollectOrder))]
    public async Task Run(
        [ActivityTrigger] Order order,
        ILogger logger)
    {
        logger.LogInformation($"Collect menu items for order {order.Id}.");
        Thread.Sleep(new Random().Next(3000, 6000));
        await base.PublishAsync(order.Id, "collect-order", new WorkflowState(order.Id));
    }
}

/// For the full implementation see https://github.com/ably-labs/serverless-workflow-visualizer/blob/main/api/PizzaWorkflow/Activities/CollectOrder.cs.
The WorkflowState object is used as the payload when publishing progress updates:
public class WorkflowState
{
    public WorkflowState(string orderId)
    {
        OrderId = orderId;
        MessageSentTimeStampUTC = DateTimeOffset.UtcNow.ToUnixTimeMilliseconds();
    }

    [JsonProperty("orderId")]
    public string OrderId { get; set; }

    [JsonProperty("messageSentTimeStampUTC")]
    public long MessageSentTimeStampUTC { get; set; }
}

/// For the full implementation see https://github.com/ably-labs/serverless-workflow-visualizer/blob/main/api/PizzaWorkflow/Models/WorkflowState.cs.
Note that the WorkflowState doesn't contain information about the exact state of the workflow. This is because named events are used, and these names correspond with the activity function name. The front-end subscribes to these named events; therefore, no additional workflow information is required in the WorkflowState.
The MessageBase class requires an IRestClient object. This is the Ably REST client, and is configured in the StartUp class, and injected in each of the activity functions:
[assembly: FunctionsStartup(typeof(StartUp))]
namespace PizzaWorkflow
{
    public class StartUp : FunctionsStartup
    {
        public override void Configure(IFunctionsHostBuilder builder)
        {
            builder.Services.AddSingleton<IRestClient>(
                new AblyRest(Environment.GetEnvironmentVariable("ABLY_API_KEY")));
        }
    }
}

/// For the full implementation see https://github.com/ably-labs/serverless-workflow-visualizer/blob/main/api/PizzaWorkflow/StartUp.cs.
The ABLY_API_KEY environment variable contains an Ably API key with publish capabilities.
Now that we've seen how the serverless workflow publishes the progress updates for each activity, let's have a look at the front-end where the messages are received.
Receiving messages in the front-end
The Vue front-end uses Pinia as the local state store. The store contains WorkflowState definitions for each of the six workflow states, which are enabled - one by one - as the workflow progresses.
export type PizzaWorkflow = RealtimeState & {
  clientId: string;
  orderId: string;
  isWorkflowComplete: boolean;
  disableOrdering: boolean;
  orderReceivedState: WorkflowState;
  kitchenInstructionsState: WorkflowState;
  preparationState: WorkflowState;
  collectionState: WorkflowState;
  deliveryState: WorkflowState;
  deliveredState: WorkflowState;
  isOrderPlaced: boolean;
};

/// For the full implementation see https://github.com/ably-labs/serverless-workflow-visualizer/blob/main/src/types/PizzaWorkflow.ts.
export type WorkflowState = {
  title: string;
  orderId: string;
  image: string;
  isVisible: boolean;
  isDisabled: boolean;
  isCurrentState: boolean;
  messageSentTimeStampUTC: number;
  messageReceivedTimestamp: number;
  messageDeliveredTimestamp: number;
};

/// For the full implementation see https://github.com/ably-labs/serverless-workflow-visualizer/blob/main/src/types/WorkflowState.ts.
The WorkflowState contains the following timestamps:
messageSentTimeStampUTC, the time set when the WorkflowState object was instantiated in the .NET back-end.messageReceivedTimestamp, the time that the message was received in the Ably platform.messageDeliveredTimestamp, the time set in the front-end when the message was received.
These three times should all be very close to each other. However some irregularities will be visible since these times are set in different machines, across various networks, meaning the clocks are not synced. Therefore it is possible that the messageReceivedTimestamp is slightly earlier than the messageSentTimeStampUTC etc. So, the times are not 100% accurate, but they are close enough to give a good indication of the speed of message delivery.
Instantiating the Ably realtime client
A WebSocket-based connection is set up using the Ably realtime client.
async createRealtimeConnection(clientId: string, order: Order) {
    if (!this.isConnected) {
        this.realtimeClient = new Realtime.Promise({
          authUrl: `/api/CreateTokenRequest/${clientId}`,
          echoMessages: false,
        });
        this.realtimeClient.connection.on(
          "connected",
          async (message: Types.ConnectionStateChange) => {
            this.isConnected = true;
            this.attachToChannel(order.id);
            if (!this.isOrderPlaced) {
              await this.placeOrder(order);
              this.$state.isOrderPlaced = true;
            }
          }
        );

        this.realtimeClient.connection.on("disconnected", () => {
          this.$state.isConnected = false;
        });
        this.realtimeClient.connection.on("closed", () => {
          this.$state.isConnected = false;
        });
      } else {
        this.attachToChannel(this.orderId);
      }
    }

/// For the full implementation see https://github.com/ably-labs/serverless-workflow-visualizer/blob/main/src/stores/index.ts.
A call is made to the CreateTokenRequest endpoint (hosted as a serverless function) which returns an authentication URL, including a token that is used to initiate a secure connection with Ably.
[FunctionName(nameof(CreateTokenRequest))]
public async Task<IActionResult> Run(
    [HttpTrigger(AuthorizationLevel.Anonymous, "get", Route = "CreateTokenRequest/{clientId?}")] HttpRequestMessage req,
    string clientId,
    ILogger log)
{
    var tokenParams = new TokenParams() { ClientId = clientId };
    var tokenData = await _ablyClient.Auth.RequestTokenAsync(tokenParams);

    return new OkObjectResult(tokenData);
}

/// For the full implementation see https://github.com/ably-labs/serverless-workflow-visualizer/blob/main/api/Auth/CreateTokenRequest.cs.
Subscribing to named events
Once a connection is established and the Ably channel is retrieved, the front-end is subscribing to the named events that correspond with the activity functions:
subscribeToMessages() {
    this.channelInstance?.subscribe(
        "receive-order",
        (message: Types.Message) => {
          this.handleOrderReceived(message);
        }
      );
      this.channelInstance?.subscribe(
        "send-instructions-to-kitchen",
        (message: Types.Message) => {
          this.handleSendInstructions(message);
        }
      );
      this.channelInstance?.subscribe(
        "prepare-pizza",
        (message: Types.Message) => {
          this.handlePreparePizza(message);
        }
      );
      this.channelInstance?.subscribe(
        "collect-order",
        (message: Types.Message) => {
          this.handleCollectOrder(message);
        }
      );
      this.channelInstance?.subscribe(
        "deliver-order",
        (message: Types.Message) => {
          this.handleDeliverOrder(message);
        }
      );
      this.channelInstance?.subscribe(
        "delivered-order",
        (message: Types.Message) => {
          this.handleDeliveredOrder(message);
        }
      );
    },

/// For the full implementation see https://github.com/ably-labs/serverless-workflow-visualizer/blob/main/src/stores/index.ts.
Each of the subscribe methods calls a handler function that updates the specific WorkflowState in the Pinia store, see for example, the handleOrderReceived handler:
handleOrderReceived(message: Types.Message) {
    this.$patch({
        orderReceivedState: {
          orderId: message.data.orderId,
          messageSentTimeStampUTC: message.data.messageSentTimeStampUTC,
          messageReceivedTimestamp: message.timestamp,
          messageDeliveredTimestamp: Date.now(),
          isDisabled: false,
          isCurrentState: true,
        },
        kitchenInstructionsState: {
          isVisible: true,
        },
      });
    },

/// For the full implementation see https://github.com/ably-labs/serverless-workflow-visualizer/blob/main/src/stores/index.ts
Updating the UI
The PizzaProcess.vue component contains the sequence of the six states in the workflow:
<template>
  <ProgressItem
    class="animate"
    v-if="(orderReceivedState as WorkflowState).isVisible"
    :state="(orderReceivedState as WorkflowState)"
  />
  <ProgressItem
    class="animate"
    v-if="(kitchenInstructionsState as WorkflowState).isVisible"
    :state="(kitchenInstructionsState as WorkflowState)"
  />
  <ProgressItem
    class="animate"
    v-if="(preparationState as WorkflowState).isVisible"
    :state="(preparationState as WorkflowState)"
  />
  <ProgressItem
    class="animate"
    v-if="(collectionState as WorkflowState).isVisible"
    :state="(collectionState as WorkflowState)"
  />
  <ProgressItem
    class="animate"
    v-if="(deliveryState as WorkflowState).isVisible"
    :state="(deliveryState as WorkflowState)"
  />
  <ProgressItem
    class="animate"
    v-if="(deliveredState as WorkflowState).isVisible"
    :state="(deliveredState as WorkflowState)"
  />
</template>

<!-- For the full implementation see https://github.com/ably-labs/serverless-workflow-visualizer/blob/main/src/components/PizzaProcess.vue. -->
The ProgressItem.vue component contains the definition of a single workflow state:
<template>
  <div class="item">
    <div class="green-dot">
      <img
        v-bind:class="{
          disabled: props.state.isDisabled,
          transition: true,
        }"
        :src="GreenDot"
        height="32"
      />
    </div>
    <div class="details">
      <img
        v-bind:alt="props.state.title"
        v-bind:title="getImgTitle(props.state)"
        v-bind:class="{
          disabled: props.state.isDisabled,
          transition: true,
        }"
        :src="props.state.image"
      />
      <p v-bind:class="{ disabled: props.state.isDisabled }">
        {{
          props.state.isDisabled
            ? "Waiting for your order..."
            : `${convertToTimeSeconds(
                props.state.messageReceivedTimestamp
              )} - ${props.state.title} (${props.state.orderId.split("-")[1]})`
        }}
      </p>
    </div>
  </div>
</template>

<!-- For the full implementation see https://github.com/ably-labs/serverless-workflow-visualizer/blob/main/src/components/ProgressItem.vue.-->
Running locally
The following dependencies are required to run the solution locally:
- .NET 6 SDK. The .NET SDK required for the C# Azure Functions.
- Node 16. The JavaScript runtime required for the Vue front-end and installing the Static Web Apps CLI.
- Azure Functions Core Tools. This is part of the Azure Functions extensions for VSCode that should be recommended for automatic installation when this repo is opened in VSCode.
- Azurite. This is a local storage emulator that is required for Durable Functions. When this repo is opened in VSCode, a message will appear to install this extension.
- Azure Static Web Apps CLI. Install this tool globally by running this command in the terminal:
npm install -g @azure/static-web-apps-cli. - A free Ably Account, sign up or log in to ably.com, and create a new app and copy the API key.
- Optional: The Ably VSCode extension to have easy access to the API keys of your Ably app.
There are two components in this solution that run independently from each other:
- The back-end that runs the Durable Functions workflow (
PizzaWorkflow.csproj). - The Static Web App that contains the front-end (a Vue3 project) and a function app (
Auth.csproj).
In order to run and test the solution locally, first start the PizzaWorkflow function app, then the Static Web Apps project.
Steps to run the PizzaWorkflow function app
- Run
dotnet restorein theapi/PizzaWorkflowfolder to install the dependencies. - Rename the
api/PizzaWorkflow/local.settings.json.examplefile toapi/PizzaWorkflow/local.settings.json. - Copy/paste the Ably API key in the
ABLY_API_KEYfield in thelocal.settings.jsonfile. - Start Azurite (VSCode:
CTRL+SHIFT+P -> Azurite: Start). - Start the PizzaWorkflow function app by either pressing
F5or runningfunc startin theapi/PizzaWorkflow/folder.
Steps to run the Static Web Apps locally
- Run
npm installin the root folder to install the dependencies. - Rename the
api/Auth/local.settings.json.examplefile toapi/Auth/local.settings.json. - Copy/paste the Ably API key in the
ABLY_API_KEYfield in thelocal.settings.jsonfile. - Run
swa startin the root folder.
Now, browse to http://localhost:4280 and click the Place Order button to start the workflow.
Summary
We've seen how to build a serverless workflow using Azure Functions and Durable Functions, and how to publish the progress in realtime using Ably. This type of solution is great for all kinds of realtime dashboards, and serverless back-ends, regardless of the cloud service provider.
When applied at a larger scale, with hundreds of workflows running simultaneously, the same approach can be used to drive a front-end summarizing progress using live charts. I'll explore this in a future post.
I encourage you to clone/fork the repository and run the solution yourself. Try to add another activity call to the workflow and have the front-end respond to it. Let me know on Discord what your experience is.


