In this article, we'll see how to use Airtable to store realtime messages using a group chat app as an example. We'll use Ably's realtime infrastructure to power the chat app and make use of WebHooks to publish messages to Airtable directly in the correct order from Ably.
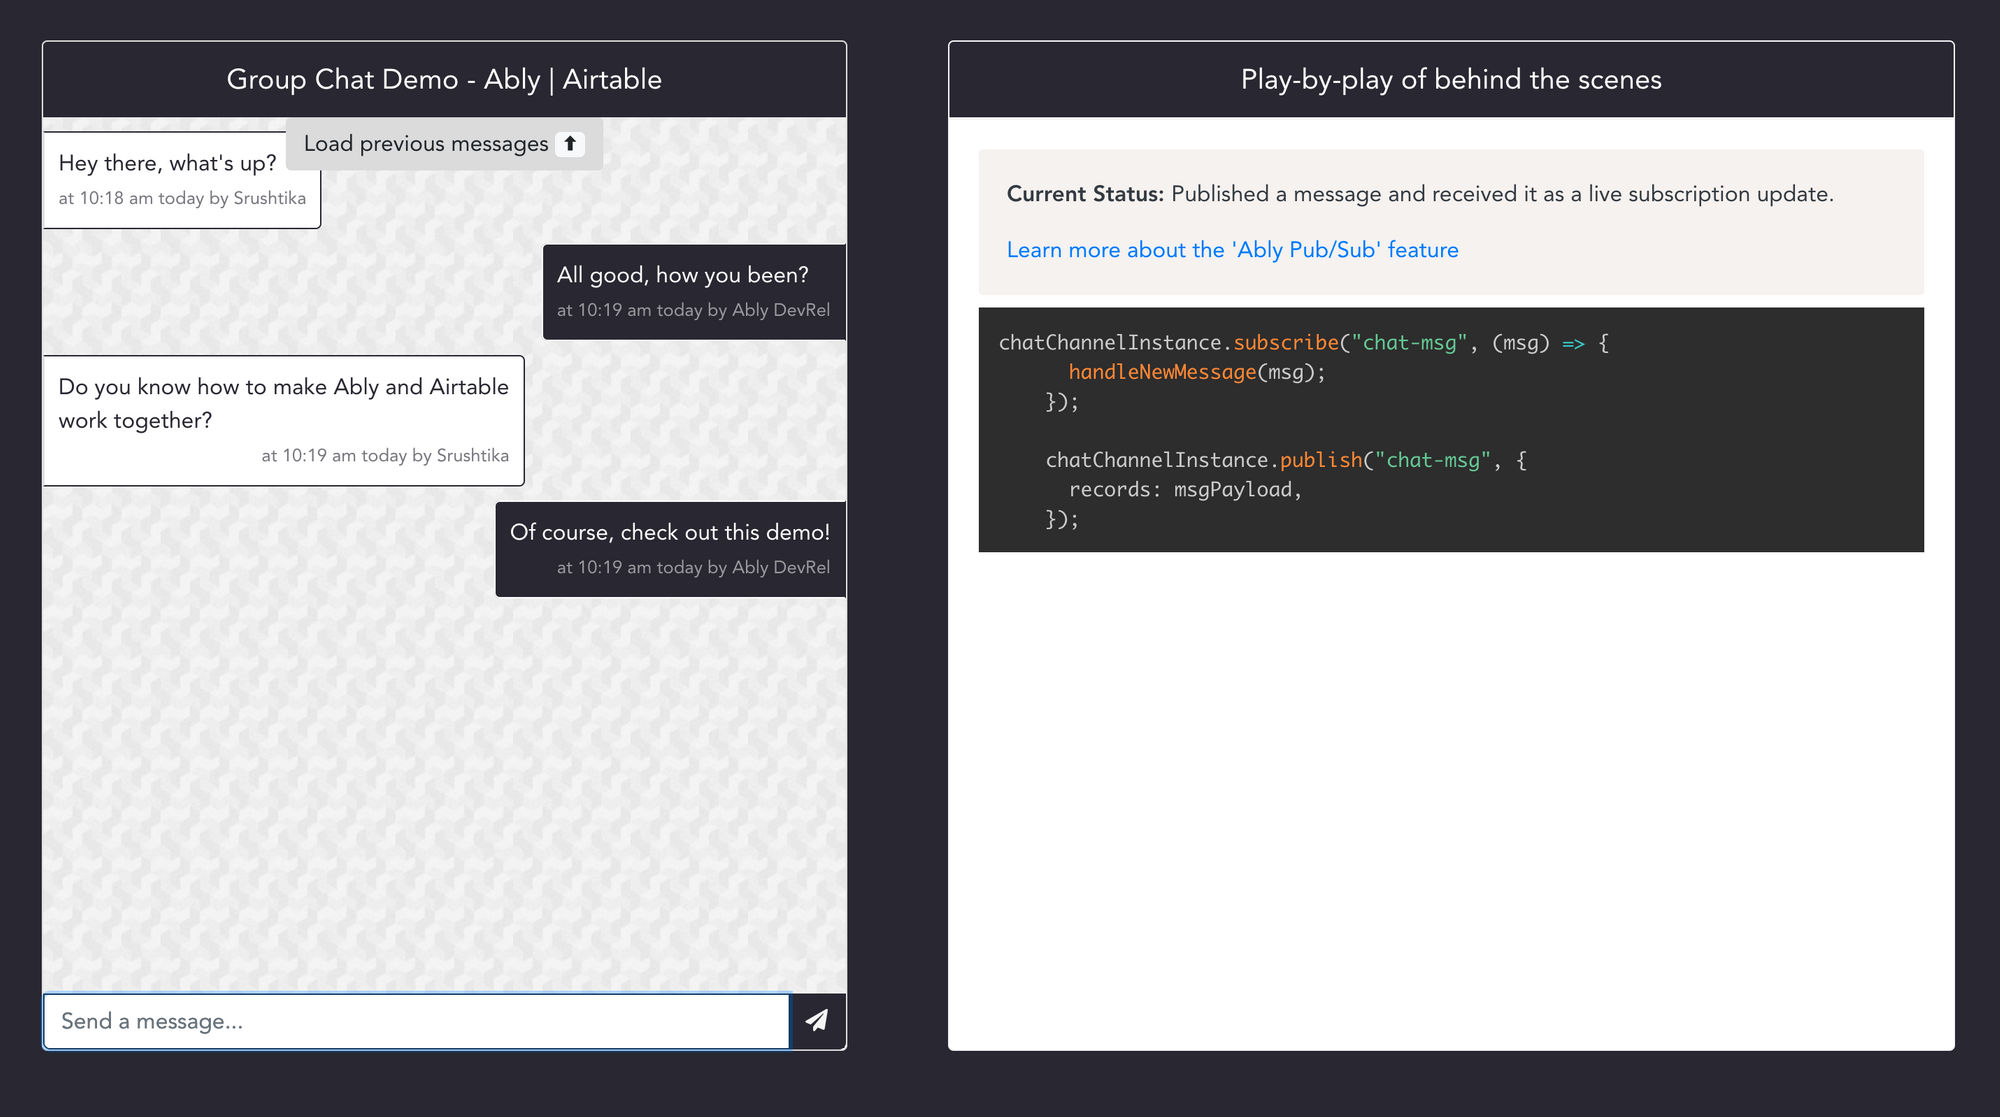
Check the full source code of the group chat app written in VueJS on GitHub and the live demo of the application at https://realtime-chat-storage.ably.dev/
What is Airtable?
Airtable describes itself as 'Part spreadsheet, part database, and entirely flexible' and that's exactly what it is to the word. It caters to the engineering and commercial departments in an organization alike with its robust REST API and very nice visual UI with custom fields to manage and represent the data. It combines a bunch of different tools like task managers, databases, CRMs, spreadsheets, etc, into a single product.

Airtable REST API
Airtable comes with a simple REST API to perform the basic CRUD operations on the data stored. You'll need to have a base i.e. a table/ sheet set up before you can check out the documentation. This is for a good reason - their whole documentation is dynamically displayed with real keys, ids, column names etc, along with sample responses, based off your data, making it super easy for you to just copy out the code and use as is. They provide this documentation in cURL and JavaScript. The JS code snippets require using the Airtable JavaScript Client SDK. Here's a look at the documentation for the chat app base.
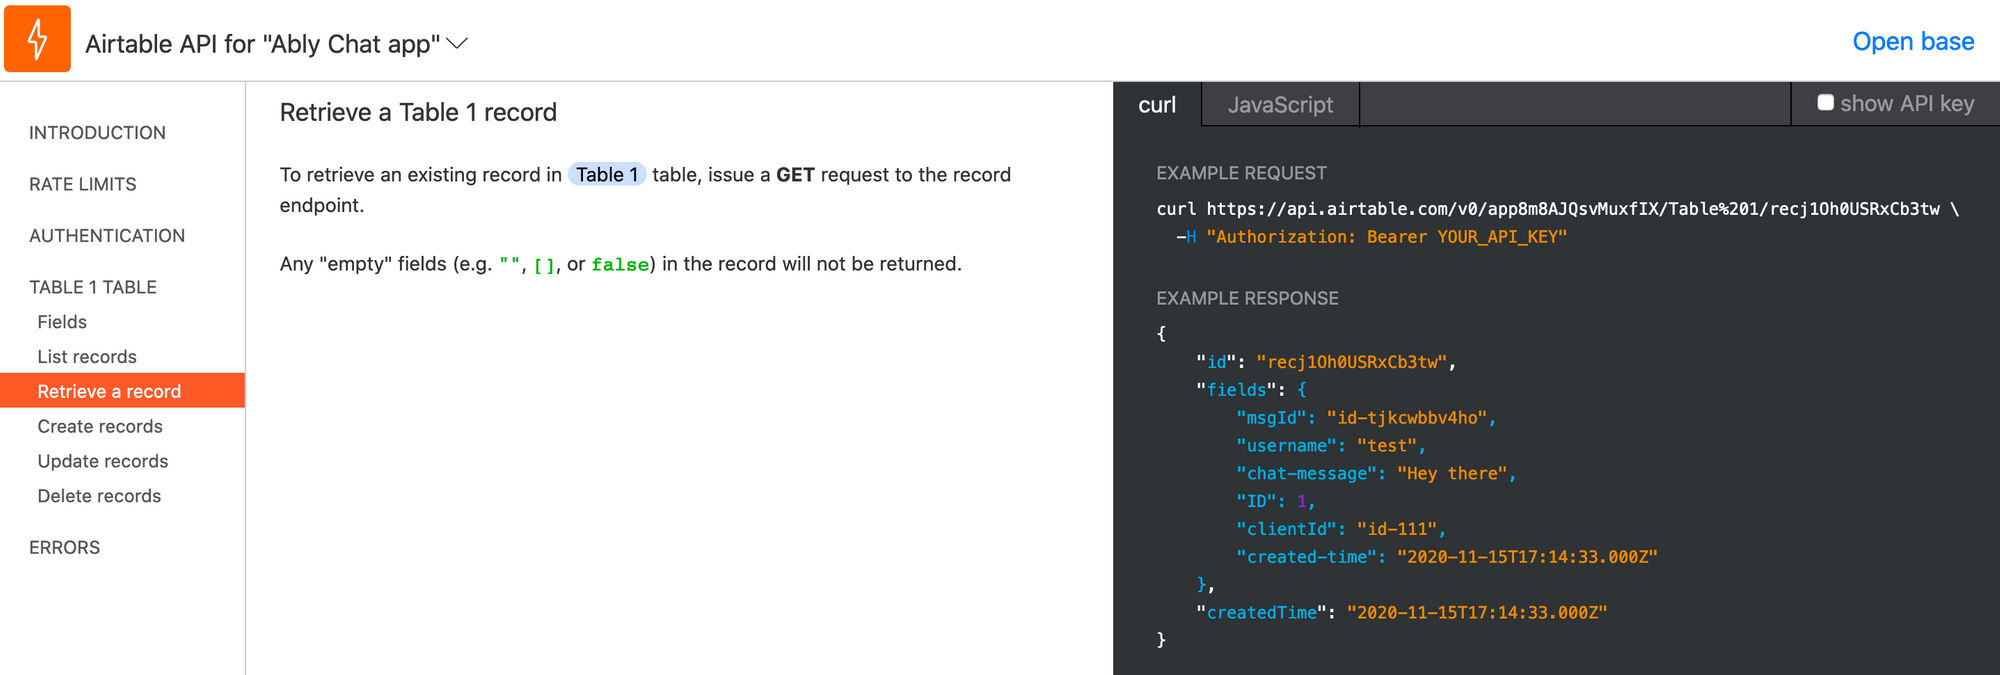
How to use Airtable as a database
In this example, we'll look at two operations - to store and retrieve data from Airtable. We'll make use of WebHooks to send 'Create records' REST requests to the Airtable API each time a new chat message is published. We'll then make use of 'List records' to retrieve previously stored messages upon user request. Here's a subset of the database so you have an idea of the schema, or to simply put it, the column names in our database table/spreadsheet:
Each new message will have a unique (randomly created) msgId. This will be our primary key. The data is pre-ordered in ascending order by the ID column, which is an incremental number assigned to every new record automatically by Airtable.
Evaluating realtime databases? Take a look at Realtime and databases — a discussion on coupling versus modularity
Realtime updates with Ably and WebHooks
If you already use Ably, you can skip this section, if not, you can get started by creating an account. Ably provides a reliable realtime messaging infrastructure with high scalability. It primarily operates over WebSockets and provides Pub/Sub messaging infrastructure out of the box. It is protocol and platform agnostic in the sense that you can use it with WebSockets, MQTT or SSE, and with any language and platform that you are working with. You don't have to spend time understanding the hard distributed systems problems it solves but simply start publishing and subscribing to realtime data with a mere couple of lines of code.
We'll make use of Ably's JavaScript Realtime SDK to power the chat app and the WebHook Integration feature to integrate Airtable directly with an Ably app.
In terms of flexibility, Airtable and Ably are a perfect match as you can use both these platforms in exactly the way that suits your custom use-case.
Ably's Pub/Sub messaging is implemented using the concept of 'channels'. Each Ably app can have any number of channels where each channel carries a group of information. For example, in a logistics app, you would have one channel for location updates of the fleet and another for job updates to inform any changes to delivery conditions etc. Depending on the data, you can set permissions as to who can publish or subscribe to the data on that channel by attaching to it. You can learn more about channels in the official documentation.
What are WebHooks?
In simple terms, webhooks are user-defined HTTP callbacks (or small code snippets linked to a web application) that get triggered when specific events take place on an external website or service. They’re especially useful when you’re building notification functions and event-driven responses in applications. You can learn more about WebHooks in the conceptual deep-dive article.
WebHooks are a great fit for our use case - sending a message to an Airtable base as a result of an event i.e. a new chat message published on a specific channel. If you go to the Reactor tab on the Ably app dashboard after logging in/ signing up, you should be able to create a 'New Reactor Rule' and select the Reactor Event > WebHook option. In a reactor rule, you essentially configure an HTTP endpoint along with the relevant headers, format, etc. You then select the source of the event trigger. There are a few options here - 'Presence', 'Message' and 'Channel Lifecycle. All we need is a regular 'Message' in this case.
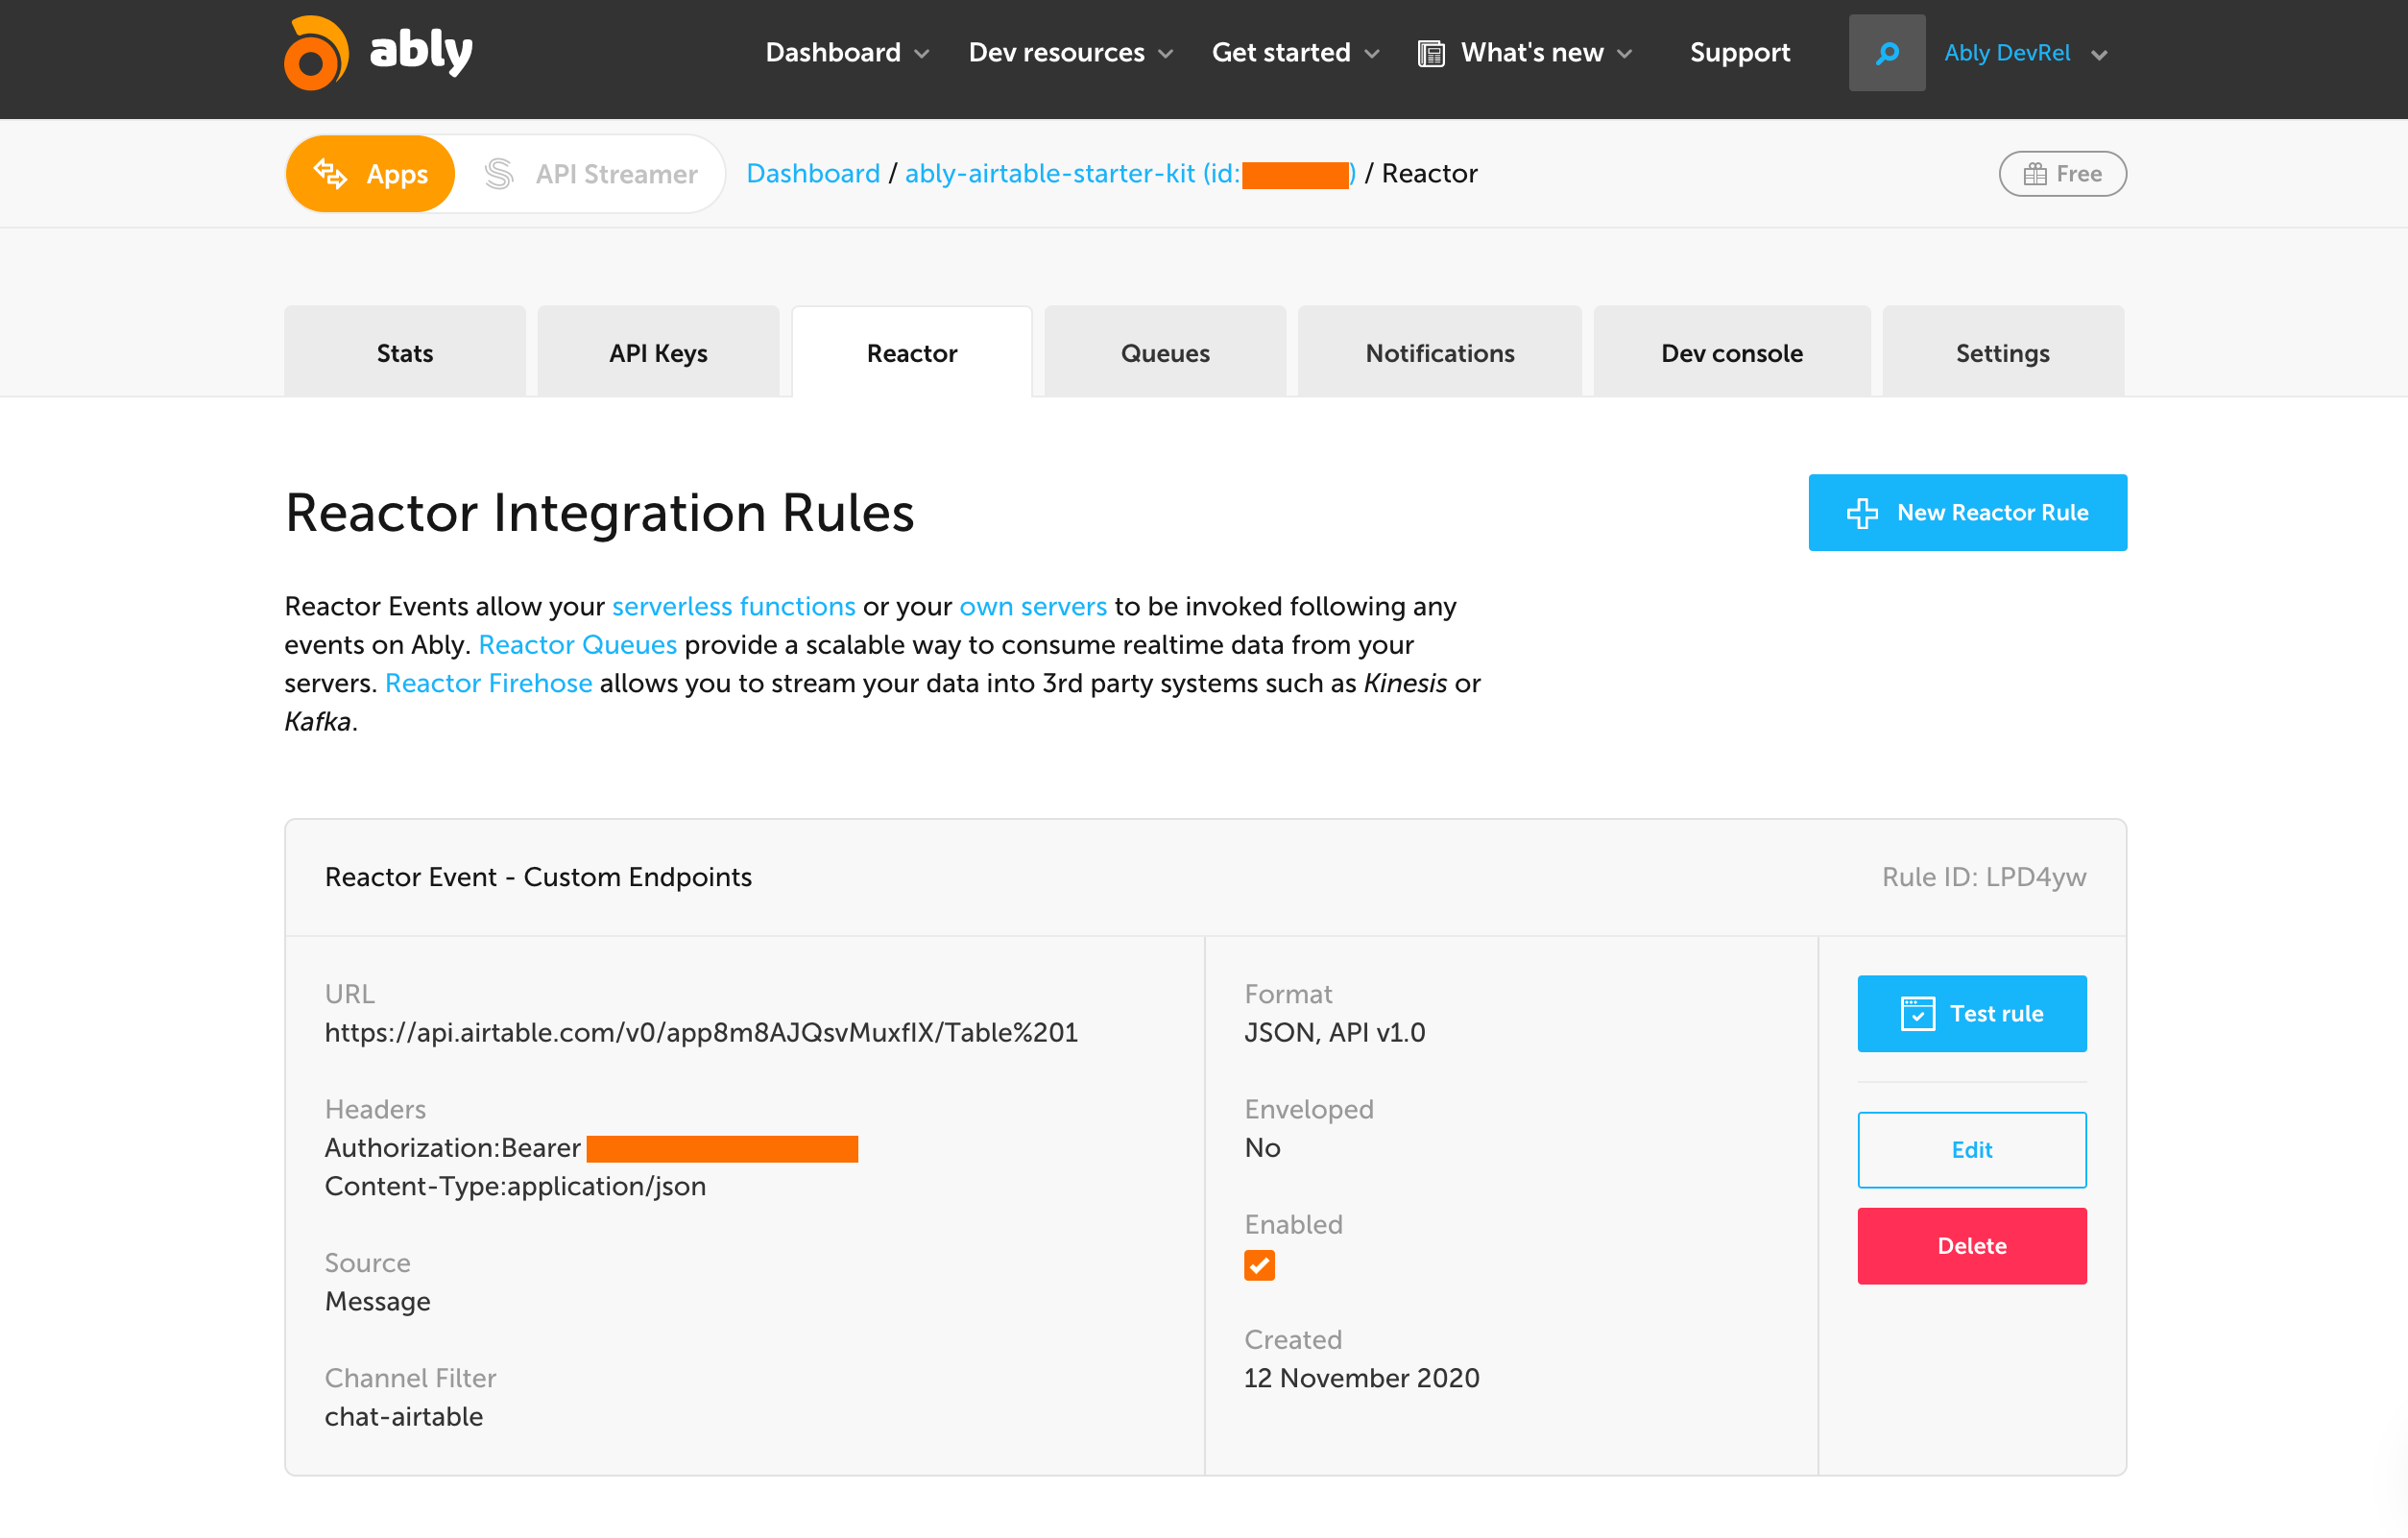
You'll also see options to batch the requests or envelop them with Ably metadata. You can choose the batch option if you expect the request to be triggered at high frequency. That'll prevent you from hitting the rate limit on Airtable, which at the time of this writing is 30 requests/ sec. We won't be enveloping the message with Ably metadata as Airtable expects the requests to be in a certain format exactly.
Bringing it all together in a group chat app built with VueJS
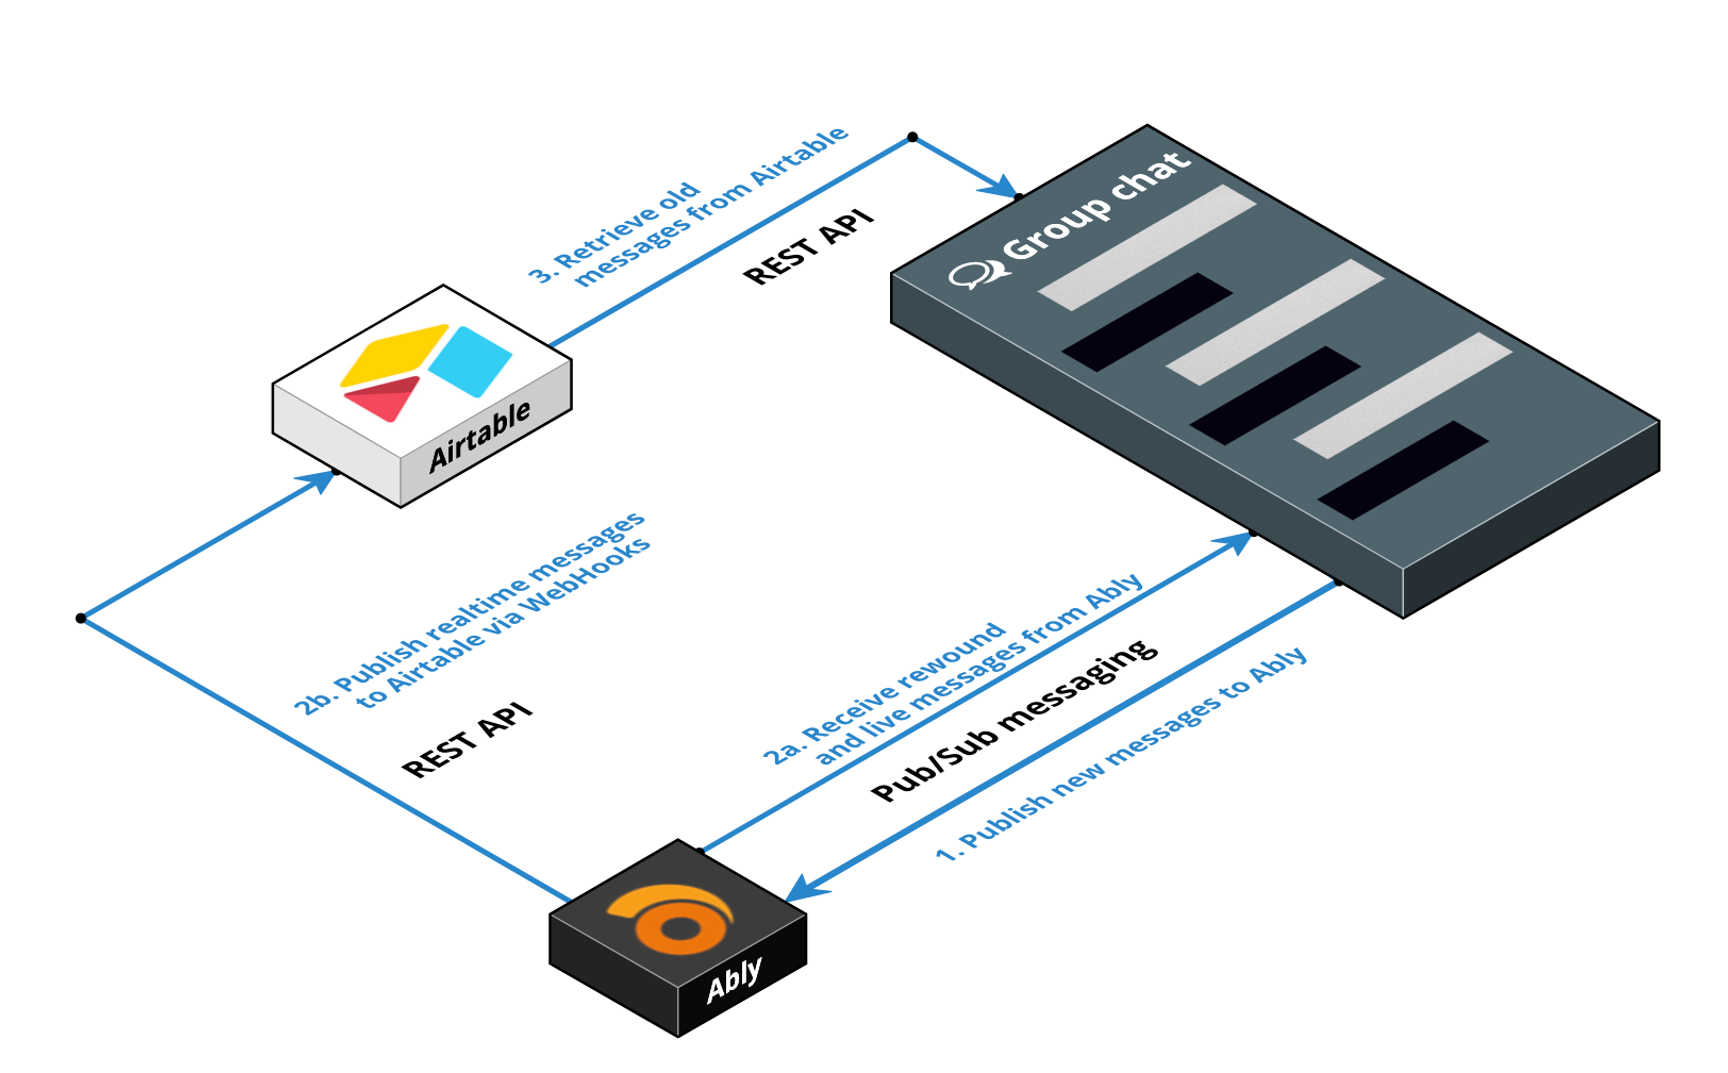
The group chat demo is written in VueJS. Here's an illustration to better understand how all the components fit together:
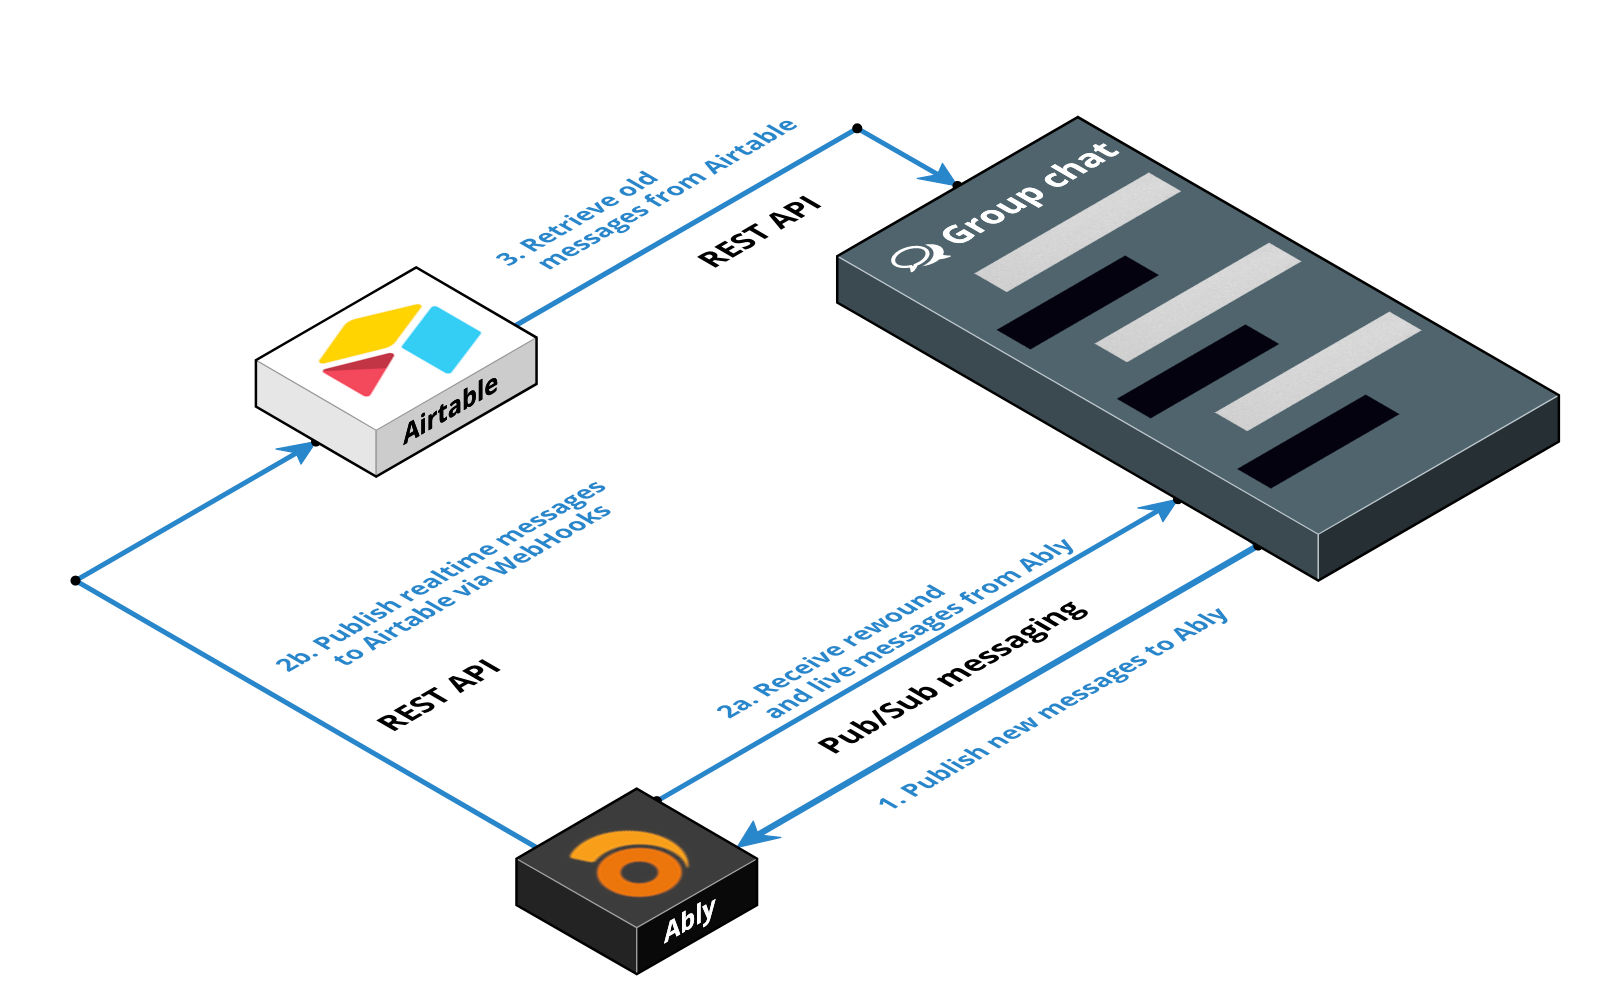
In terms of the folder structure you see in the GitHub project, the following are the main files of interest to us in this article.
ably-airtable-storage
| __ src
| __ | __ App.vue
| ______ | __ components
| __________ | __ infobox
| __________ | __ chatbox
| ______________ | __ ChatCard.vue
| ______________ | __ UsernameInput.vue
| ______________ | __ ChatMessage.vue
| ______________ | __ ChatInput.vue
server.js
The ably-airtable-storage folder holds the VueJS app whereas the server.js file in the root serves the VueJS app and issues auth tokens to the front-end app to authenticate with Ably. (More on this later)
As you saw in the live demo, we also have an information box on the side which shows the play-by-play of behind the scenes as you use the app. You can make use of that to understand what exactly is happening in each step and use the code snippets to try it out yourself. The code for this is in the infobox folder under the components folder. We won't be discussing much about the information box in this article.
Let's take a look at what's going on in the rest of the files.
server.js
This is a super simple Express server which serves the index.html page from the dist folder of the Vue app. The dist folder is generated when you run the build command after you are done working on the Vue app. You can learn more about this in VueJS docs.
You'll notice that we also have an /auth endpoint. As mentioned before, this is to issue tokens so the Vue app can authenticate securely with Ably's realtime service. Ably offers two ways of authenticating - Basic Auth and Token Auth. Basic auth uses the API Key directly whereas token auth expects auth tokens or JWT, making it a more secure way of authenticating the front-end applications. You can learn more about each of these types and trade-offs in Ably's documentation and best practice guide.

The VueJS chat app
-
App.vue
This is the main parent component for the entire app. So, a good place to instantiate and manage the connection with Ably.
We instantiate Ably in the created() lifecycle hook of this component and disconnect in the destroyed() lifecycle hook:
  created() {
    this.ablyRealtimeInstance = new Ably.Realtime({
      authUrl: "/auth",
    });
    this.ablyRealtimeInstance.connection.once("connected", () => {
      this.myClientId = this.ablyRealtimeInstance.auth.clientId;
      this.isAblyConnected = true;
      this.chatChannelInstance = this.ablyRealtimeInstance.channels.get(
        this.chatChannelId
      );
    });
  },
  destroyed() {
    this.ablyRealtimeInstance.connection.close();
  },
The authUrl object sent to the Ably.Realtime instance prompts Ably that we are looking to authenticate via token auth via the given URL to automatically renew tokens just before they expire.
After the connection status becomes connected, we get an instance of the channel to subscribe to later. If you remember from the previous step, we'd need to use the chat-airtable channel name for publishing and subscribing to the chat messages as that is the channel we are using to trigger messages sent to the Airtable database. If you notice, the full name we specify, however, is [?rewind=2m]chat-airtable. The channel name is preceded by some meta-information enclosed in the square brackets. The channel param used there is Rewind with a value set to 2 minutes. This allows you to get any previously published messages in the last 2 minutes before successfully establishing a connection to Ably and attaching to the channel. You can learn more about all the available channel params from Ably's docs.
2. ChatCard.vue
This is the parent component for the Group chat app, so we subscribe to updates on the chat channel here:
created() {
    this.isReadyToChat = false;
    this.chatChannelInstance.subscribe((msg) => {
      this.handleNewMessage(msg);
    });
},
We subscribe to the chat channel and call a new method to handle the new message every time the callback is invoked. More on this shortly.
This component has three child components:
- UsernameInput.vue - accepts user's name before they join the chat
- ChatInput.vue - accepts users' chat message if they'd like to send one
- ChatMessage.vue - shows all chat messages in the group chat
The parent component has quite a few regular methods as well, here's a break down of each:
i) The saveUsernameAndJoin() method
saveUsernameAndJoin(username) {
  this.clientUsername = username;
  this.isReadyToChat = true;
  this.chatChannelInstance.presence.enter(username);
  backgroundEventBus.$emit("updateBackgroundEventStatus", "join-chat");
}
This method is invoked from the UsernameInput.vue component and saves the username entered by the user. Ably's Presence feature allows you to see the realtime connection status of any client. This is useful to see which users are currently online. We make this user enter the presence set with their username in this method. The backgroundEventBus is a VueJS state management mechanism to emit various events to the infobox component.
ii) The handleNewMessage() method:
async handleNewMessage(msg) {
  let messageContent = msg.data.records[0].fields;
  let msgTimestamp = msg.timestamp;
  await this.chatMsgsArray.push({
    messageContent,
    msgTimestamp,
    msgType: "live",
  });
  if (this.$refs.chatMsgsBox) {
    let divScrollHeight = this.$refs.chatMsgsBox.scrollHeight;
    this.$refs.chatMsgsBox.scrollTop = divScrollHeight;
  }
  if (messageContent.clientId != this.myClientId && this.isReadyToChat) {
    backgroundEventBus.$emit(
      "updateBackgroundEventStatus",
      "live-msgs-loaded"
    );
  }
}
Continuing from the channel subscription, this method is called for every new message pushed on chat the channel. We extract the required fields from the message and push it into the chatMsgsArray which is used to display messages in the chat screen. This is a live msg (vs one that is retrieved from a database).
iii) The loadPreviousMsgs() method:
loadPreviousMsgs() {
  if (this.chatMsgsArray[0]) {
    this.getMsgsFromDBWithMsgID();
  } else {
    this.getLatestMsgsFromDB();
  }
}
This method is called when the 'load previous messages' popup is clicked. It checks if there is a previous message present in the chat array or not. Accordingly, calls other methods to retrieve messages from the database.
iv) The getMsgsFromDBWithMsgID method:
getMsgsFromDBWithMsgID() {
  this.latestMsgId = this.chatMsgsArray[0].messageContent.msgId;
  this.showLoadMoreBtn = false;
  setTimeout(() => {
    this.showLoadMoreBtn = true;
  }, 500);
  this.base = new Airtable({
    apiKey: configVars.AIRTABLE_API_KEY,
  }).base(configVars.AIRTABLE_BASE_ID);
  let vueContext = this;

  this.base("Table 1")
    .select({
      view: "Grid view",
      filterByFormula: "SEARCH('" + vueContext.latestMsgId + "',{msgId})",
    })
    .eachPage(function page(records, fetchNextPage) {
      const latestRecordID = records[0].fields.ID;
      vueContext.dbAutoNumber = latestRecordID;
      if (latestRecordID) {
        vueContext.getMsgsFromDBWithAutoID();
      } else {
        fetchNextPage();
      }
    });
}
This method is invoked when there's a previous message present in the array. Note that all the records in the database are pre-ordered chronologically with an auto incrementing ID field. We use the msgId of the earliest message to find that record's ID in the Airtable database, then send another request to retrieve three records with ID less than the previously retrieved record's ID. This is done in the getMsgsFromDbWithAutoID() method added next:
getMsgsFromDBWithAutoID() {
  let vueContext = this;
  this.base("Table 1")
    .select({
      maxRecords: 3,
      view: "Grid view",
      filterByFormula: "({ID}<" + vueContext.dbAutoNumber + ")",
      sort: [{ field: "ID", direction: "desc" }],
    })
    .eachPage(
      function page(records, fetchNextPage) {
        records.forEach(async function(record) {
          await vueContext.chatMsgsArray.unshift({
            messageContent: record.fields,
            msgTimestamp: 123,
            msgType: "db",
          });
          backgroundEventBus.$emit(
            "updateBackgroundEventStatus",
            "db-msgs-loaded"
          );
          if (vueContext.$refs.chatMsgsBox) {
            vueContext.$refs.chatMsgsBox.scrollTop = 0;
          }
        });
        fetchNextPage();
      },
      function done(err) {
        if (err) {
          console.error(err);
          return;
        }
      }
    );
}
We add each of the retrieved records at the front of the chatsMsgsArray so they appear at the top of the chat list in the UI as the messages are ordered chronologically.
v) The getLatestMsgsFromDB() method:
getLatestMsgsFromDB() {
  this.base = new Airtable({
    apiKey: configVars.AIRTABLE_API_KEY,
  }).base(configVars.AIRTABLE_BASE_ID);
  let vueContext = this;
  this.base("Table 1")
    .select({
      maxRecords: 3,
      view: "Grid view",
      sort: [{ field: "ID", direction: "desc" }],
    })
    .eachPage(
      function page(records, fetchNextPage) {
        records.forEach(async function(record) {
          await vueContext.chatMsgsArray.unshift({
            messageContent: record.fields,
            msgTimestamp: 123,
            msgType: "db",
          });
          backgroundEventBus.$emit(
            "updateBackgroundEventStatus",
            "db-msgs-loaded"
          );
          if (vueContext.$refs.chatMsgsBox) {
            vueContext.$refs.chatMsgsBox.scrollTop = 0;
          }
        });
        fetchNextPage();
      },
      function done(err) {
        if (err) {
          console.error(err);
          return;
        }
      }
    );
}
This method is invoked if there were no messages in the chatMsgsArray, meaning there was no earliest record to reference. We simply need the last three messages available in the database. The previous option can be combined with this as the filterByFormula field is the only differentiator, but it's added in two separate methods to make the two cases evidently clear.
3. ChatInput.vue
As mentioned before, this method manages the input box to add a new chat message. It has a single method that is invoked when the send button is clicked:
publishMessage() {
  if (this.myMessageContent != "") {
    const uniqueMsgId =
      "id-" +
      Math.random()
        .toString(36)
        .substr(2, 16);

    this.msgPayload = [
      {
        fields: {
          clientId: this.myClientId,
          msgId: uniqueMsgId,
          username: this.clientUsername,
          "chat-message": this.myMessageContent,
        },
      },
    ];

    this.chatChannelInstance.publish("chat-msg", {
      records: this.msgPayload,
    });
    backgroundEventBus.$emit("updateBackgroundEventStatus", "publish-msg");
    this.myMessageContent = "";
  }
}
In this method, we compute a random (unique) id to assign to the message and publish it on the chat channel with the message copy and other information like the clientId and username. As the echoMessages Ably client option is turned off by default, the same client also receives this message as a subscription update on the channel, leading to that message being added to the array and ultimately appearing in the UI.
As the UsernameInput.vueand ChatMessage.vue components are pretty much self-explanatory with minor data transformation and display, we'll skip explanations on those.
With that, we've closed the full loop of data transfer from publisher to subscriber to the database and back to the subscriber. Here's the link again to the live demo so you can check it out again and piece the above information together: https://realtime-chat-storage.ably.dev/
Exploring other ways to get data from Airtable into Ably
You might say it's all working fine, why explore of other ways? While we can publish messages directly into Airtable and retrieve those message again from the front-end app, we have a few gaps in this project stopping it from being production-ready.
What if for whatever reason, someone adds a message in Airtable? We won't be able to show those new messages in the chat app until the whole thing is refreshed and refreshing is not fun and a no-go when dealing with realtime data. While Airtable is not a realtime database i.e. it doesn't push any changes out, we have a work-around to this problem. Enter, Zapier!
Using Zapier and Ably to convert Airtable into a realtime database (well, kind of)
Zapier is a workflow management application which connects two or more SaaS platforms to share event-driven data. We can connect Airtable and Ably on Zapier and have it publish a message to a given Ably channel when a new record is added in the Airtable database. It would like something like this:
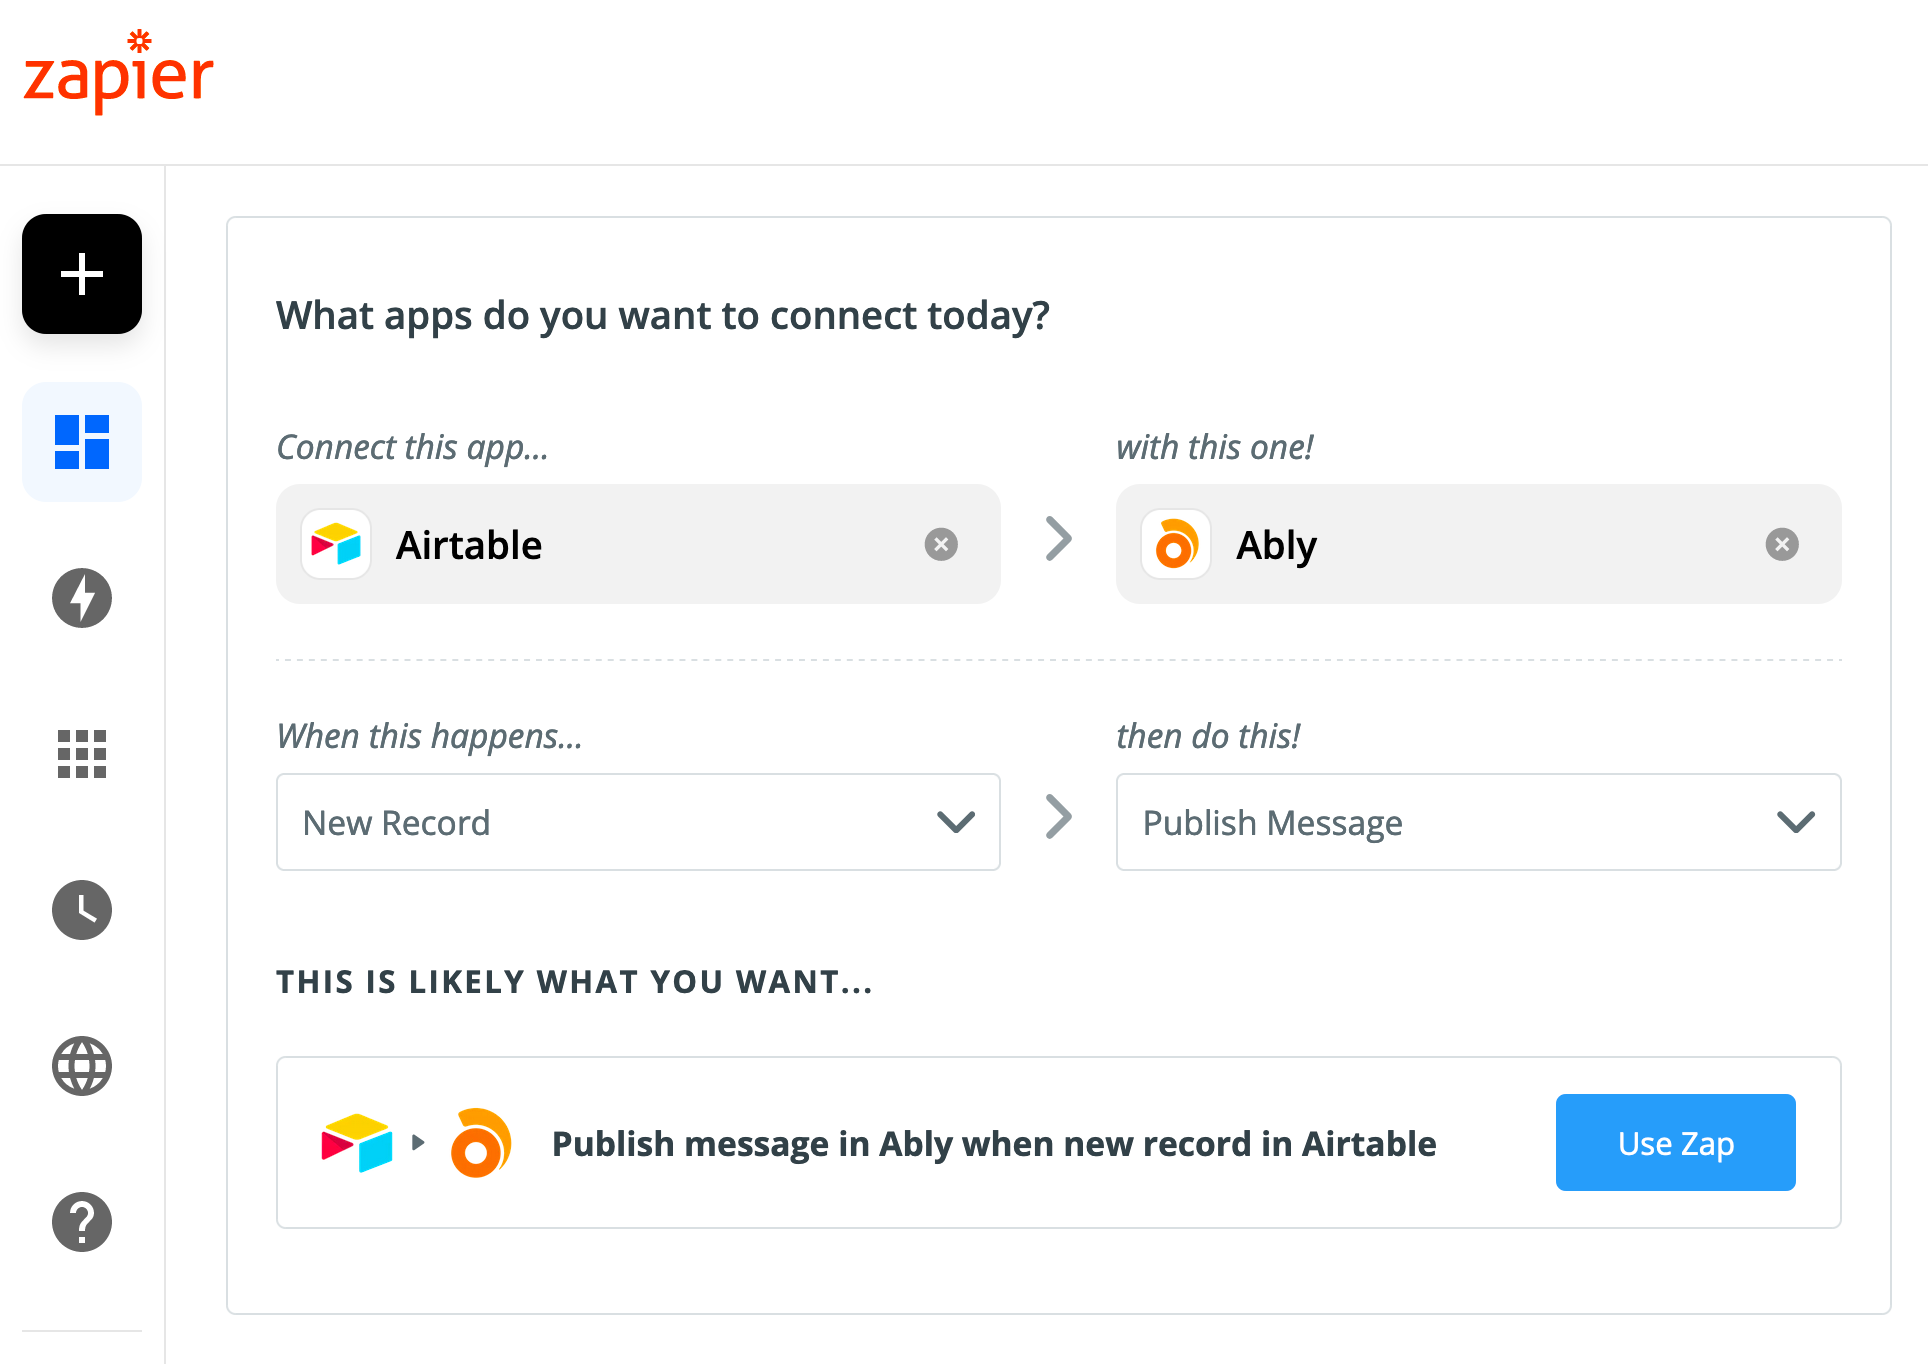
You can decide if you want these updates published on the same chat channel or a different one and manage those updates accordingly. A quick note here is that you can publish different events on the same Ably channel to differentiate different types of updates. You can learn more about event name object in the publish method in Ably docs.
Replacing REST requests with GraphQL
If you followed through the explanation for the chat app, you know that if we want to retrieve messages from a given point in the database, we'll need to send two subsequent requests to get the actual required data. Don't worry if you skipped through that entire section, I understand it was long :) You can just look for the phrase getMsgsFromDBWithMsgID and you'll land in the right section that I'm referring to here.
We can optimize that process by replacing the REST requests with the popular kid on the block - GraphQL! While it's not supported officially by Airtable, Thomas Cullen built a GraphQL plugin for Airtable as a community contributed project and it's perfect for this scenario. You can check it out on NPM.
Summing it up...
Airtable and Ably are great services with just the right level of flexibility in terms of usage. We saw how to publish and subscribe to realtime messages using Ably and automatically have those messages stored in Airtable in realtime using the WebHooks Integrations feature.
We also saw how to retrieve just the required messages from Airtable and display them for the user. We further explored other options of retrieving and publishing data to Airtable.
Live demo: https://realtime-chat-storage.ably.dev/
GitHub project: https://github.com/ably-labs/ably-airtable-starter-kit
Hope this post was useful. If you are building something with Airtable and Ably, I'd love to see your project and give it a shoutout. And of course happy to help you with any questions or concerns. You can raise them at [email protected] or DM me on Twitter.
