I started working for Ably recently, at the beginning of 2022. One of the first tasks I was given was to build a demo project that used one of the Ably SDKs. Working as a backend Go developer for the past 4 years made my choice of SDK easy. I definitely wanted to work with ably-go.
I found myself wondering how to explore, debug and test an SDK in a visual way, rather like how the Postman API Client interacts with an API. I knew that the Ably platform functions in realtime, so any tool that interacted with Ably would also need to work in realtime. I also knew from my previous experience of playing, testing and developing computer games that computer games react to user input in realtime.
At the core of a computer game is an infinite loop called the game loop. This loop is responsible for drawing pixels to a screen, playing sounds and updating logic. Time and timing matters as code responds to key presses and mouse clicks as they happen.
My plan was to build a graphical user interface that could explore, test and debug the ably-go SDK and I was going to accomplish this by using a game engine. The main constraint I had was because I wanted to interact with a Go SDK, I would need to build my tool in Go.
Why work with Ebiten?
To build a game, a developer essentially needs low level access to audio, keyboard, mouse and graphics. Existing libraries which are capable of this are mostly written in the C-family of languages, not Go. While one such library called SDL2, does have bindings for Go, I found the learning curve to be quite steep when I first tried building a game with it. Mostly because whenever Go builds a project that talks to a C library Go requires the developer to have a C compiler installed. Also working directly with the bindings means that a lot of low level code needs to be written to accomplish things like drawing some text on the screen.
There is however an open-source 2D game engine called Ebiten, which is written in Go. I knew Ebiten would be able to do a lot of the heavy lifting for me. Ebiten maps native OpenGL functions to Go functions making it fast and easy to draw images to the screen. Ebiten has also been around for several years now, has over 6k stars on GitHub and is actively developed, updated and maintained, which is really nice!
I'm going to explain how I got started working with Ebiten and include some example code for each stage of development. The official documentation for Ebiten along with more examples can be found at ebiten.org.
1. Getting started with a new Ebiten project
The first thing to do is to import Ebiten and define the game object. A game object must satisfy Ebiten's Game interface. It does this by having the methods Update, Draw and Layout with the same signatures as Ebiten's Game interface. By satisfying the Game interface, the game object is allowed to be passed to Ebiten's RunGame function, which starts the game.
At the core of the game, is an infinite loop called the game loop. One cycle of this loop corresponds to one frame. If the game is running at 60 frames per second, this means that every second the loop will have completed 60 cycles. Each cycle of the game loop, known as a frame, consists of calling Update to update the state of the game,then calling Draw to draw the current state of the game to the screen.
In a new folder, create a main.go file containing the following code. Once this is done, initialize the project for go modules with command go mod init then run the command go mod tidy. This results in Go fetching all the project dependencies and creating go.mod and go.sum files to manage them. To run the game go build -o myGame && ./myGame this will create an executable file called myGame then start running that file. You should see an empty black window appear on your screen.
You will notice that the ebiten package imported is github.com/hajimehoshi/ebiten/v2. All example code will be using v2 of Ebiten. If you are following along and using an IDE that automatically imports packages, please take care to ensure that v1 imports are not automatically used.
2. Drawing a .png image on the screen
The screen that the Draw method accepts as a parameter is of type image. When we want to draw a .png image to the screen, Ebiten renders that .png image on top of the screen image. It's also possible to use DrawImageOptions to transform an image. DrawImageOptions can change the location, rotation, color or transparency of an image.
Create a folder called images in your project and save a .png image there. In the example code, I have used this image of the world.
To work with a .png image we need to import the standard library package image/png . This package is solely imported for it's side effects (initialisation) so a blank identifier is used as the explicit package name. e.g. import _ image/png. If we don't do this, we will get an error image: unknown format as any code we write won't understand the .png format the image is in.
Prior to starting our game with RunGame we need to load the .png image into memory. While it is possible to embed an image into a Go binary, the approach we are going to take in this tutorial is to load the image into memory from a file. Ebiten has a utility package that we can use to do this. Loading the image should take place as an initialisation stage of the game, before the game is run with RunGame.
We will use a global variable of type *ebiten.Image to hold the image in memory. In the game's Draw method we create a new DrawImageOptions. DrawImageOptions can include the location to draw the image at, color options, alpha options and texture filter options. The DrawImage method receives the world image and the DrawImageOptions. For now we are just passing some empty options to DrawImage which will draw the image on the screen at x,y coordinates of 0,0. After making the call to screen.DrawImage in the Draw method of the game, build and run the project. Instead of a black screen you should now see your image.
3. State, screens and transitions
One of the challenges in any software project is managing complexity. It is important to keep code organized in such a way that it can be easily understood and reasoned about. One approach that I take to this is to divide a project into different screens or states.
If you were building a card game, you might have a title screen and a game screen. Then you could separate code for the title screen into its own file. The game screen could also contain its own code in its own file. In the example of a card game, you might have different states for the different phases of the game, e.g. initializing cards, dealing cards, playing cards, matching cards, scoring cards. Then the code for each of these phases could be separated into its own file. While this might not seem necessary on a new project which does not contain much logic, it's much easier to make decisions about code organization at the beginning of a project before complexity starts to increase.
We are going to divide this project into three screens, a starting title screen and two optional screens that the user can choose to visit. We will accept keyboard input from the user and use this to navigate between the different screens.
We will start by creating a new file called state.go to contain all the possible states our project can be in. For the purpose of this tutorial we will divide the world, which is shown on our title screen into a screen for the Northern hemisphere and a screen for the Southern hemisphere. Sometimes in code when we separate things from each other, we care about the names of those things. However in this situation, we don't really care about the names of our screens, only that they are distinct from each other.
A good idiom for this in Go is to use the iota identifier which simplifies constant definitions. Constants which use iota have values which use increasing integer numbers to distinguish them from each other. It is also a good idea to use a custom type for the possible states, that way rather than accepting an integer value, we can require code to accept one of our custom types. This gives the advantage that the Go compiler will tell us about any places in our code if they use an integer instead of a game state.
In the main.go file we are going to add a new global variable to hold the game state. We are also going to add a init function to set the game state to be the title screen when the project initializes.
We are then going to create three new files, screen_title.go, screen_northern.go and screen_southern.go . These files will contain both the draw and update logic for each screen. Each of these files has its own initialize function, draw function and update function. The main game loop's draw method in main.go will use a switch statement depending on the state of the game to call the corresponding draw function for the current screen. The main games update loop in main.go will use the same pattern to call the corresponding update function for the current screen.
On the Northern screen, we are going to display an image of the northern hemisphere
On the Southern screen, we are going to display an image of the Southern hemisphere
Now it's great we have these different screens, but a user will need a way to navigate between them. One way this can be done is to accept keyboard input from the user. The user will start on the title screen, then if they press the N key or S key on the keyboard, we will take them to the Northern screen or the Southern screen depending on which key they pressed. While on either the Northern or Southern screen, if the user presses the Escape key, they will return them to the title screen.
Ebiten has a package called inpututil which can be used to detect key presses. When a keypress is detected, the game state is updated. The update functions for each screen detect if a key is pressed and change the game state accordingly.
4. Drawing text on the screen
The next thing we will want to start thinking about is drawing text to the screen. This is so we can both communicate with the user and also display data. To display text, we need to import three things. Firstly we need the golang.org/x/image/font package. This package provides interfaces for font faces. We also need a .ttf font file. In this tutorial we will be using a .ttf font file that is included as a resource within the Ebiten example projects by importing "github.com/hajimehoshi/ebiten/examples/resources/fonts". Finally we need a font rasterizer. A rasterizer is a package which takes vector graphics and converts them into a raster image made up of pixels which when displayed together will resemble the vector graphics. The rasterizer we will use is called freetype it is worth noting that freetype only supports true type fonts, so make sure to use a font file which ends .ttf in your project.
After adding the three imports named above, we will declare a global variable of type font.Face. Then we can use the rasterizer to parse the .ttf and to generate a font.face from the font. This is done by specifying the options for the font face, such as size, dots per inch (DPI) and hinting. It's important to pre-load the font face into our global variable during initialization so that it's ready and available to be used as soon as the game starts. It is for this reason that the code that generates the font.Face needs to live inside an init function.
We are close to being able to draw some text to the screen now, but we still need one more thing, which is a color to display the text in. Colors can be defined using the Go standard library package image/color by defining a color.NRGBA. The four values in a color represent the amount of red, green, blue and alpha. The N in NRGBA stands for not premultiplied. Here are some examples of declaring colors.
    White := &color.NRGBA{0xff, 0xff, 0xff, 0xff}
    Black := &color.NRGBA{0x00, 0x00, 0x00, 0xff}
    JazzyPink := &color.NRGBA{0xff, 0x17, 0xd2, 0xff}
So now we have a font.face and a NRGBA color defined, we are able to draw text to the screen and this is done using the package "github.com/hajimehoshi/ebiten/v2/text". In the Draw method of the game loop, we set up DrawImageOptions and make a call to text.Draw
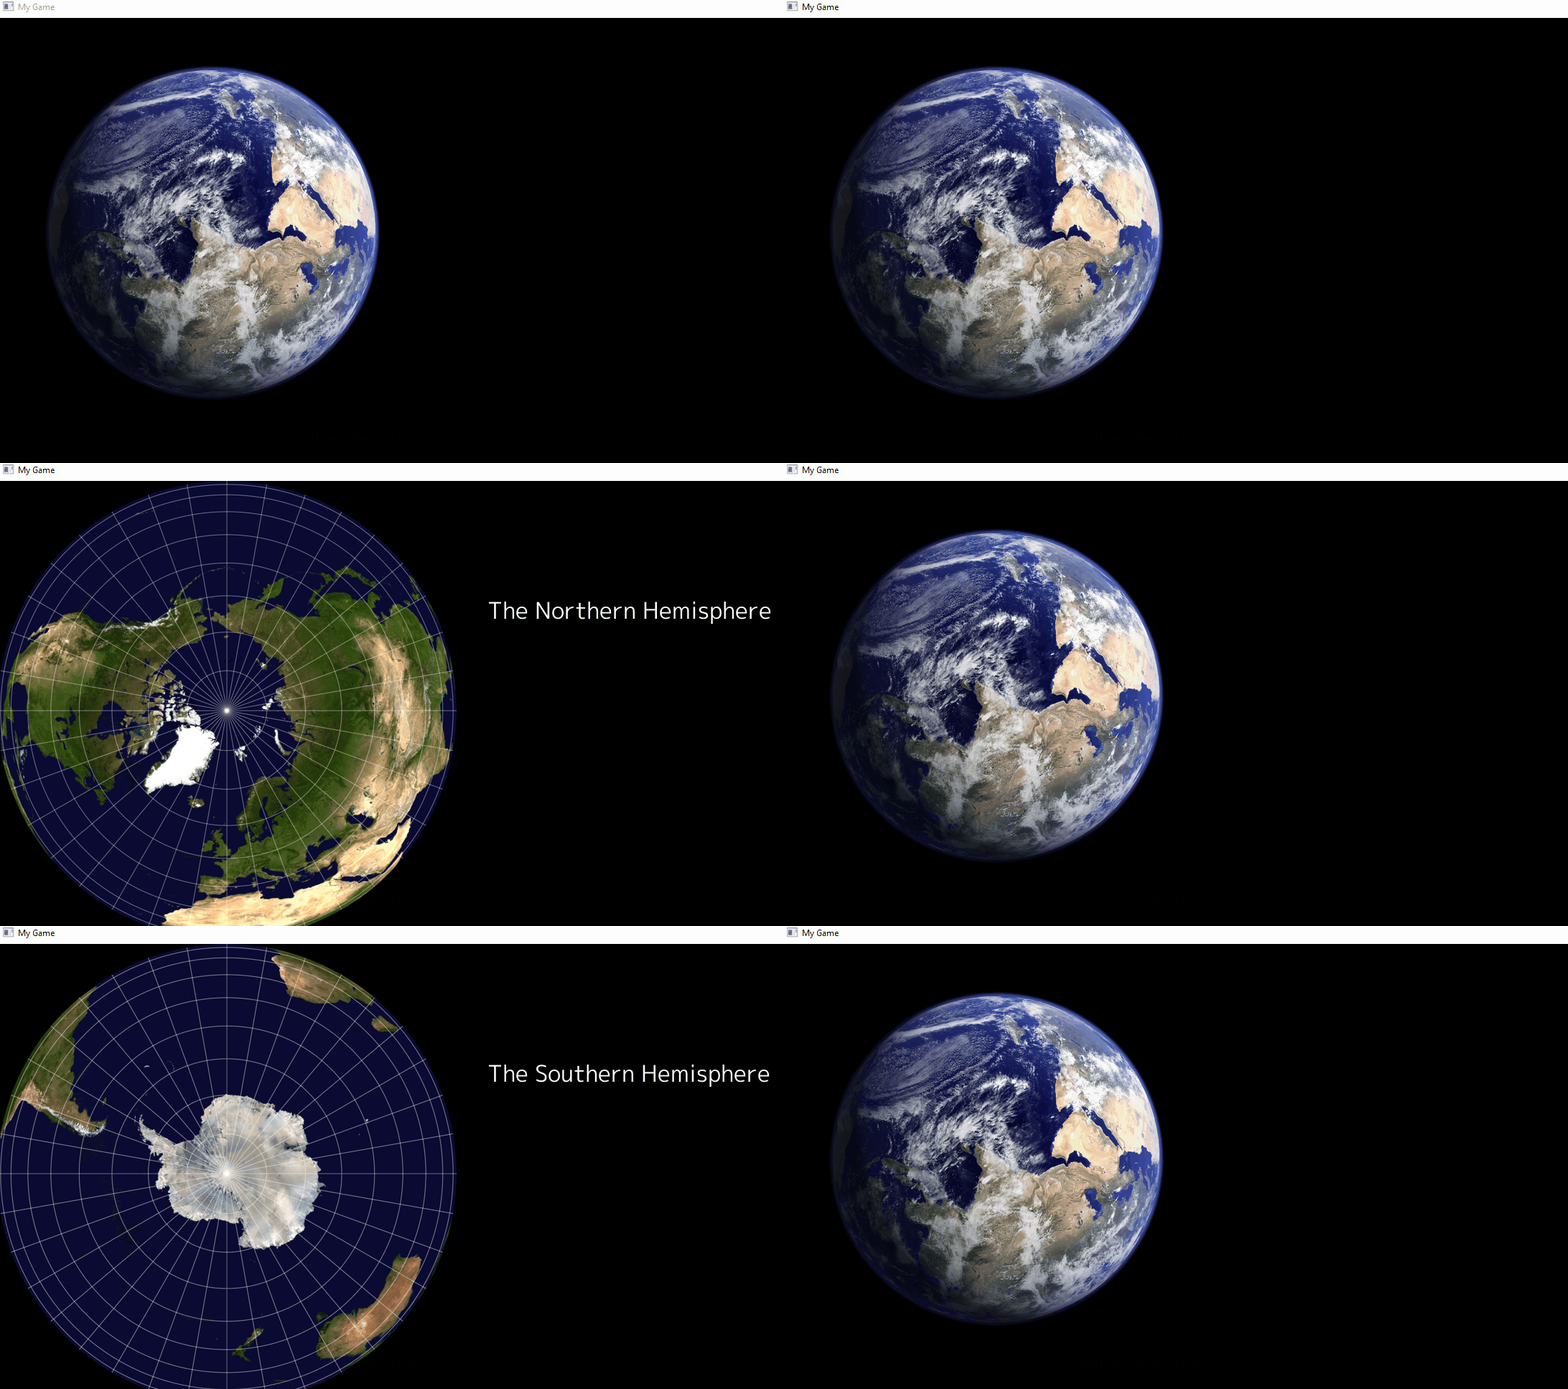
In the example code, the text "The Northern Hemisphere" has been added to the Northern screen and "The Southern Hemisphere" has been added to the southern screen.
Now we have imported images, created screens, added transitions between screens and displayed text. The example code should look something like this when it is run.
Putting everything together to build Ableye
I was able to use some of the functionality of Ebiten described above to build my own tool called Ableye.
Ableye is essentially a visualization and graphical interface that sits directly on top of the ably-go SDK.
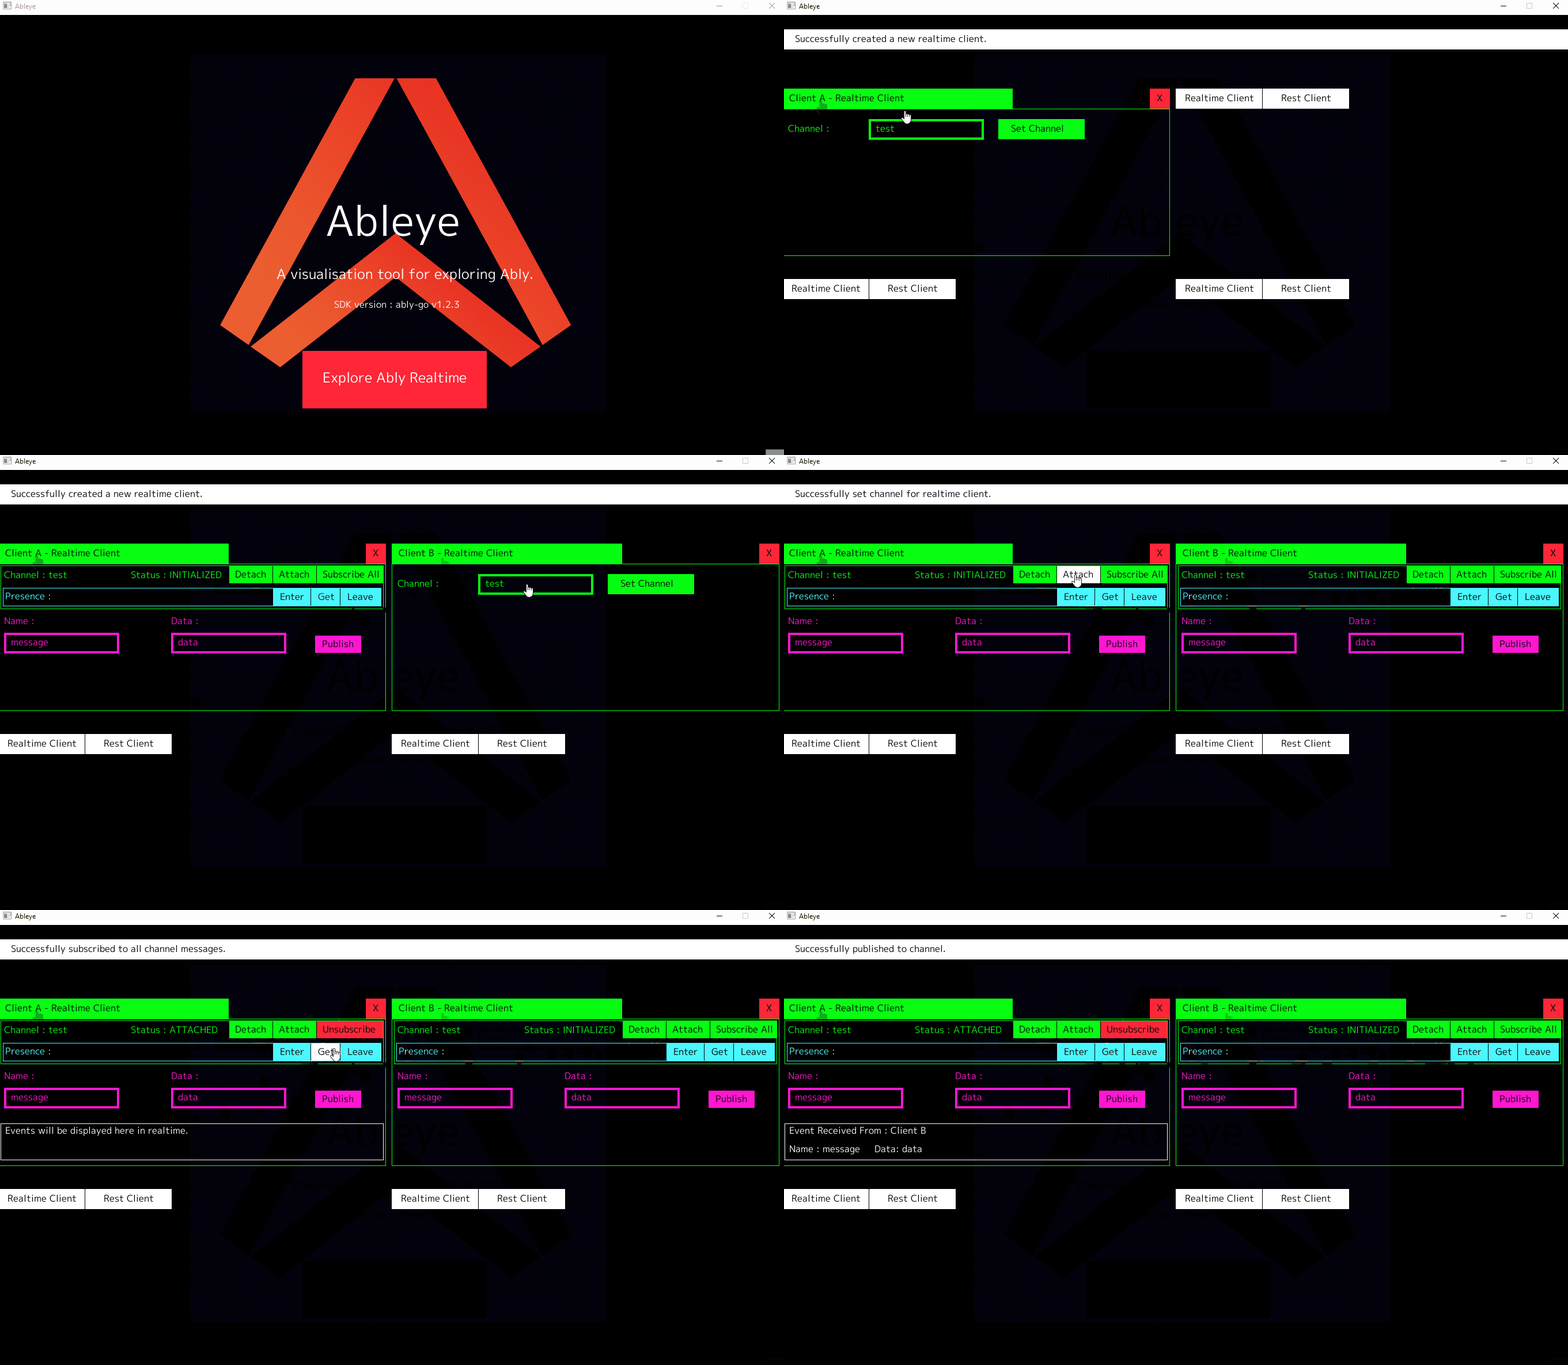
Ableye supports creation of up to four Ably clients in a single window. Those clients can be either Ably Realtime clients or Ably REST clients. After creating a Realtime client, a channel can be set by inputting a channel name then left mouse clicking on the Set Channel button. Once a channel has been initialized, it can be subscribed to by clicking the Subscribe All button. After subscribing to a channel a window will appear to display events in realtime. While subscribed, an Unsubscribe button will be displayed which can be used to unsubscribe. It is also possible to attach or detach from the channel at any time by clicking on the Attach or Detach buttons. Presence can be interacted with using the Enter, Get and Leave buttons. Message name and message data can be input and published to the channel using the Publish button.
Here is some footage of Ableye in action showing how one client can subscribe to a channel, a second client can publish a message to that channel and the first client receives the message in realtime.
This was a great learning exercise as I was able to learn about the ably-go SDK while exploring it. I also now have a tool I can use to help debug issues. By attaching a Delve debugger I have also been able to set breakpoints and step through the SDK in debug mode to diagnose bugs.
Using Ebiten to build an interface does require a little bit of careful planning but the rewards can be high. Even though at the design stage there are many questions to be answered. What will the interface look like? How will the user interact with my tool? Will they use a mouse, keyboard or both? With a little experimentation, I found Ebiten to be flexible enough to solve a wide range of problems. In my Ableye tool I was able to build text boxes that accepted user input and used those values to make calls to the SDK.
Things I learned in the process of building Ableye
One good pattern to follow when designing interfaces is not to make x,y coordinates explicit e.g. don't hard code their pixel values. Make x,y coordinates relative. If an element needs to be drawn in the middle of a 600 x 800 screen, instead of drawing that element at 300,400 instead define the screen width and height as constants and draw the element at (screenWidth/2),(screenHeight/2). This means that if the screen dimensions ever need to change, the element will remain in the middle of the screen.
Getting feedback from others while developing is also very important. Especially if you would like people to adopt your tool and start using it. I was lucky enough to be able to show my tool to people as I was building it and get feedback throughout the build process. Don't wait until the end to share your work with others.
I hope you have enjoyed learning about how to build realtime tools with graphical interfaces using Go and Ebiten. If you are looking for more project ideas, a great tutorial on how to build your own chat application using ably-go can be found here.
About Ably
Ably’s platform provides a suite of APIs to build, extend, and deliver synchronized digital experiences in realtime for millions of simultaneously connected devices across the world. We solve hard engineering problems in the realtime sphere every day and revel in it. You can find us on Twitter or LinkedIn.
